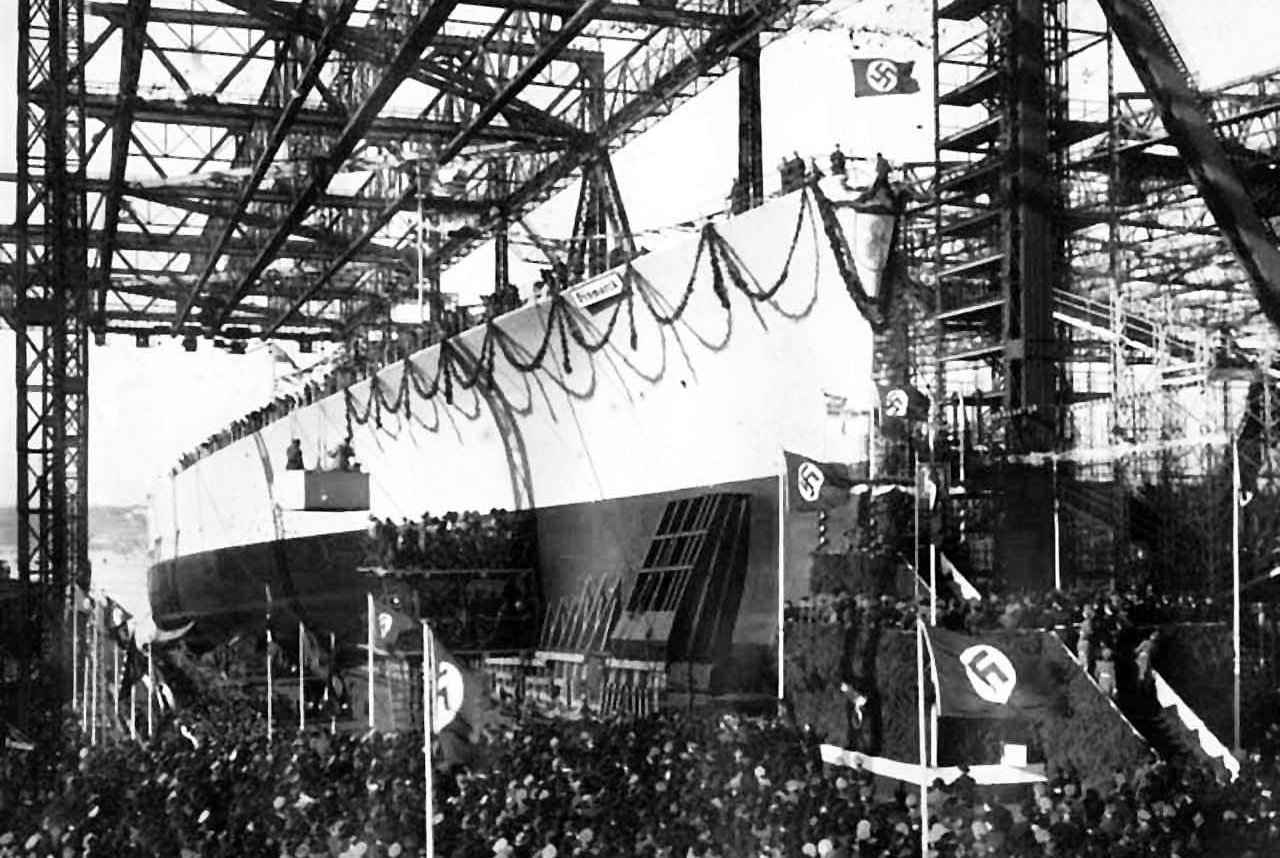
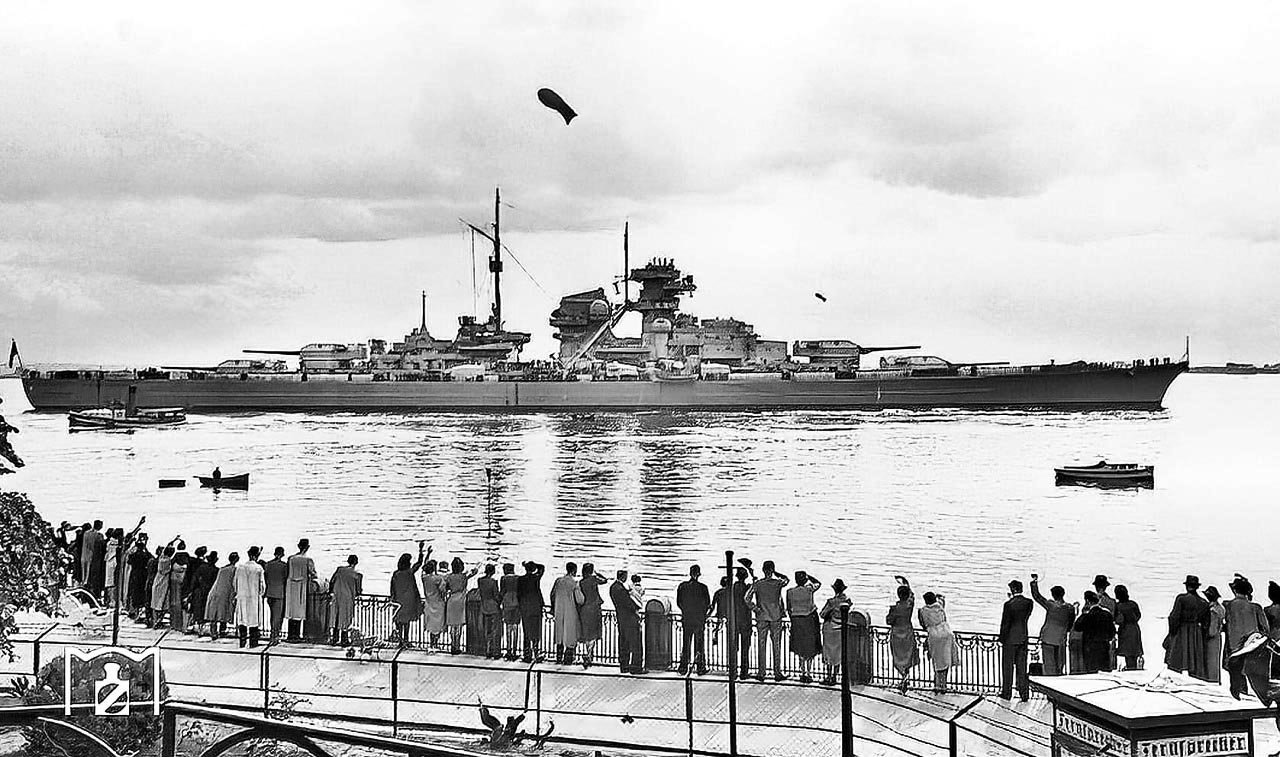
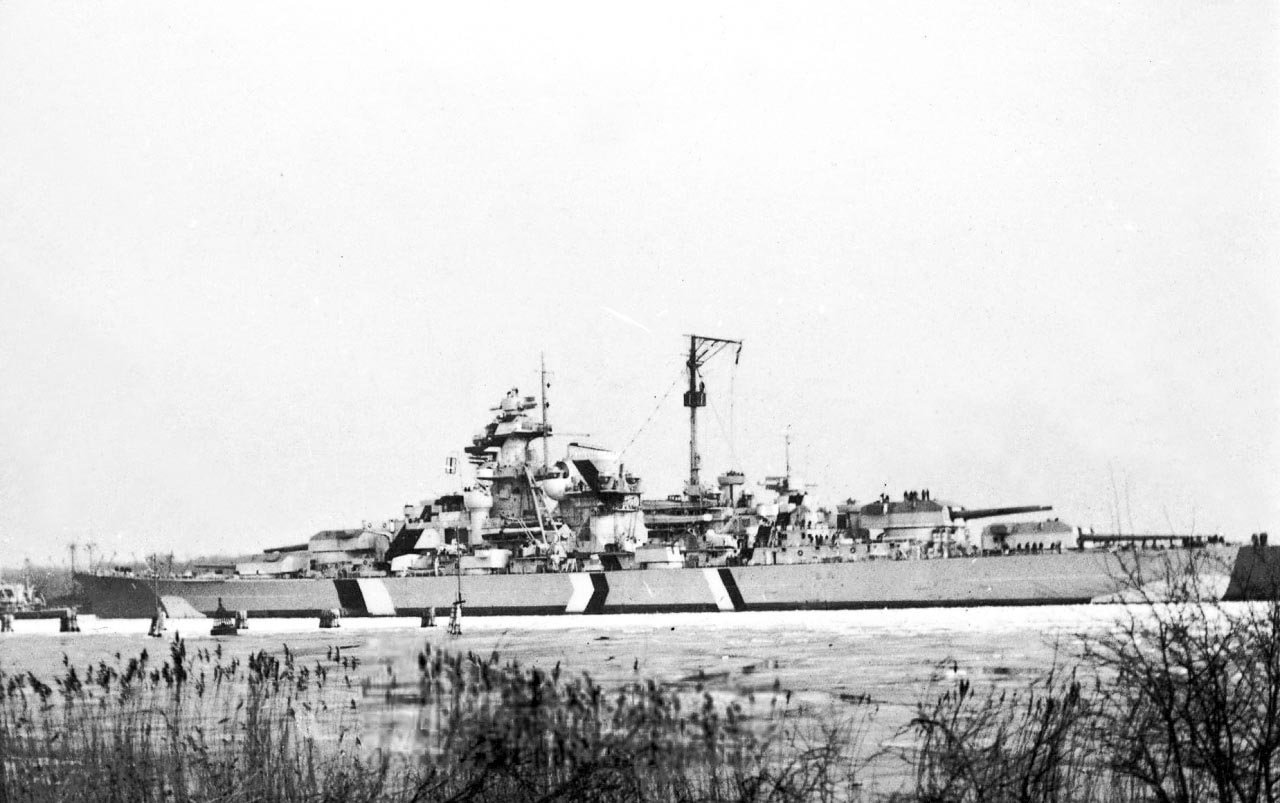
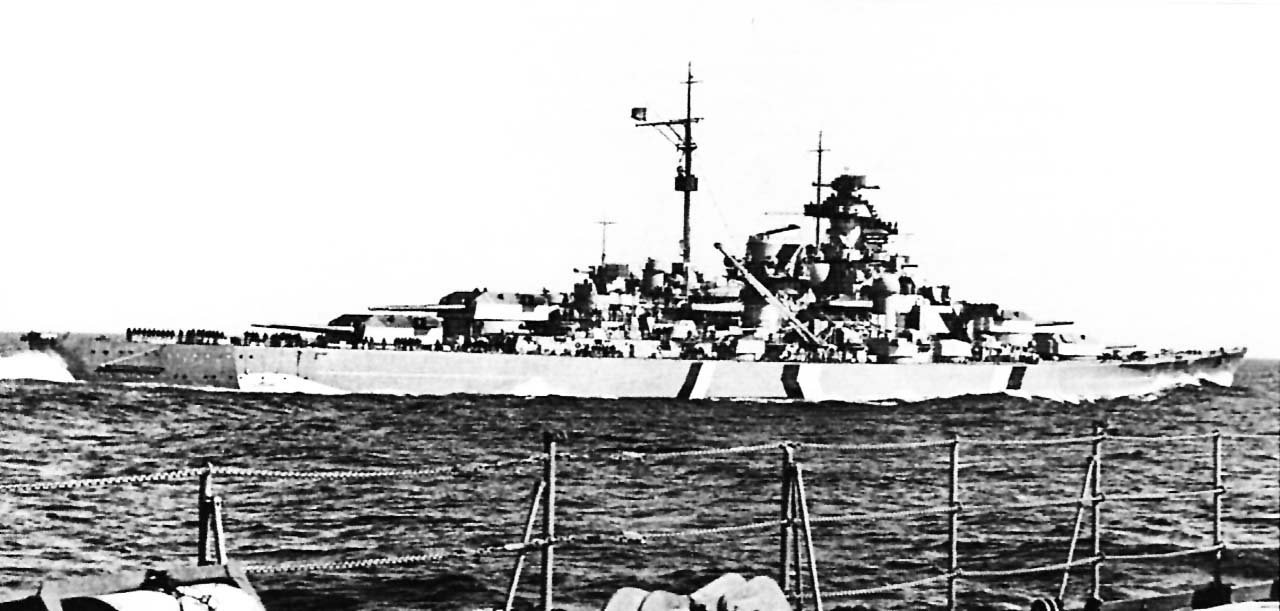
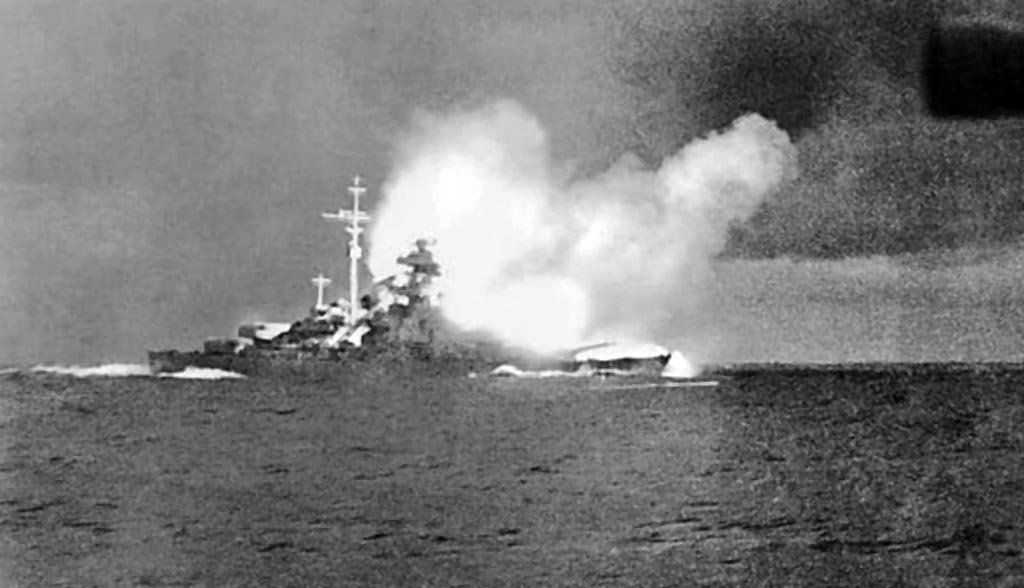
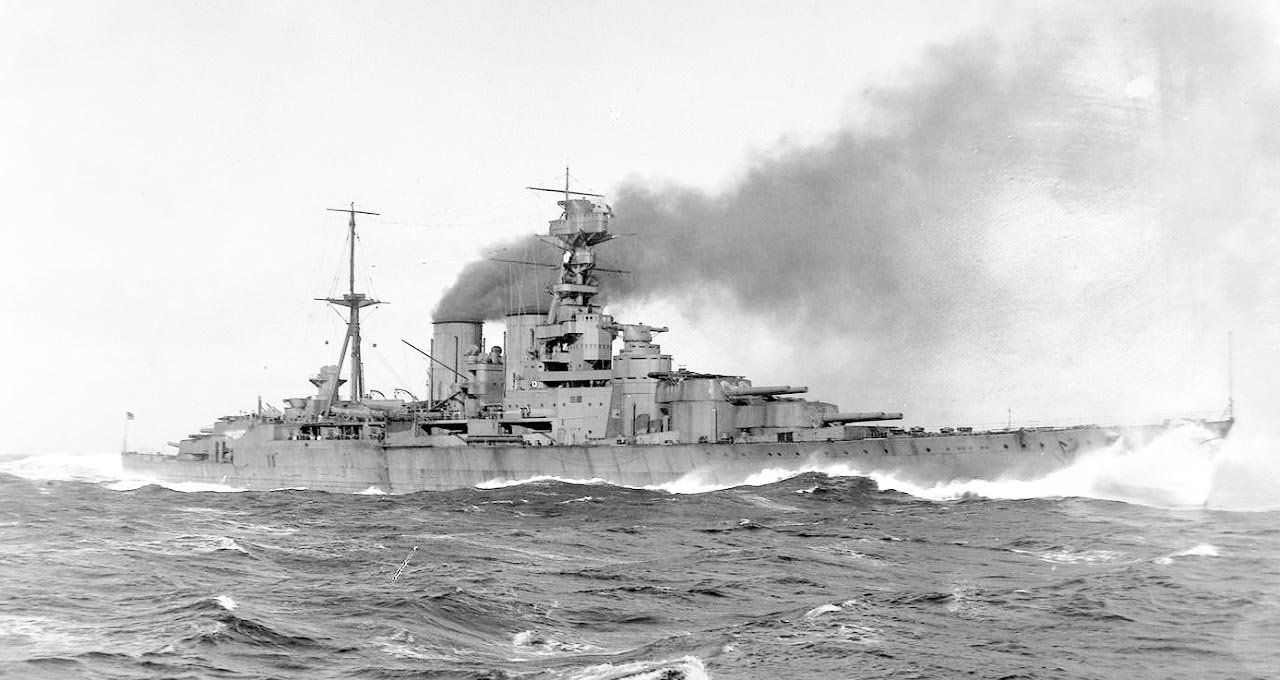
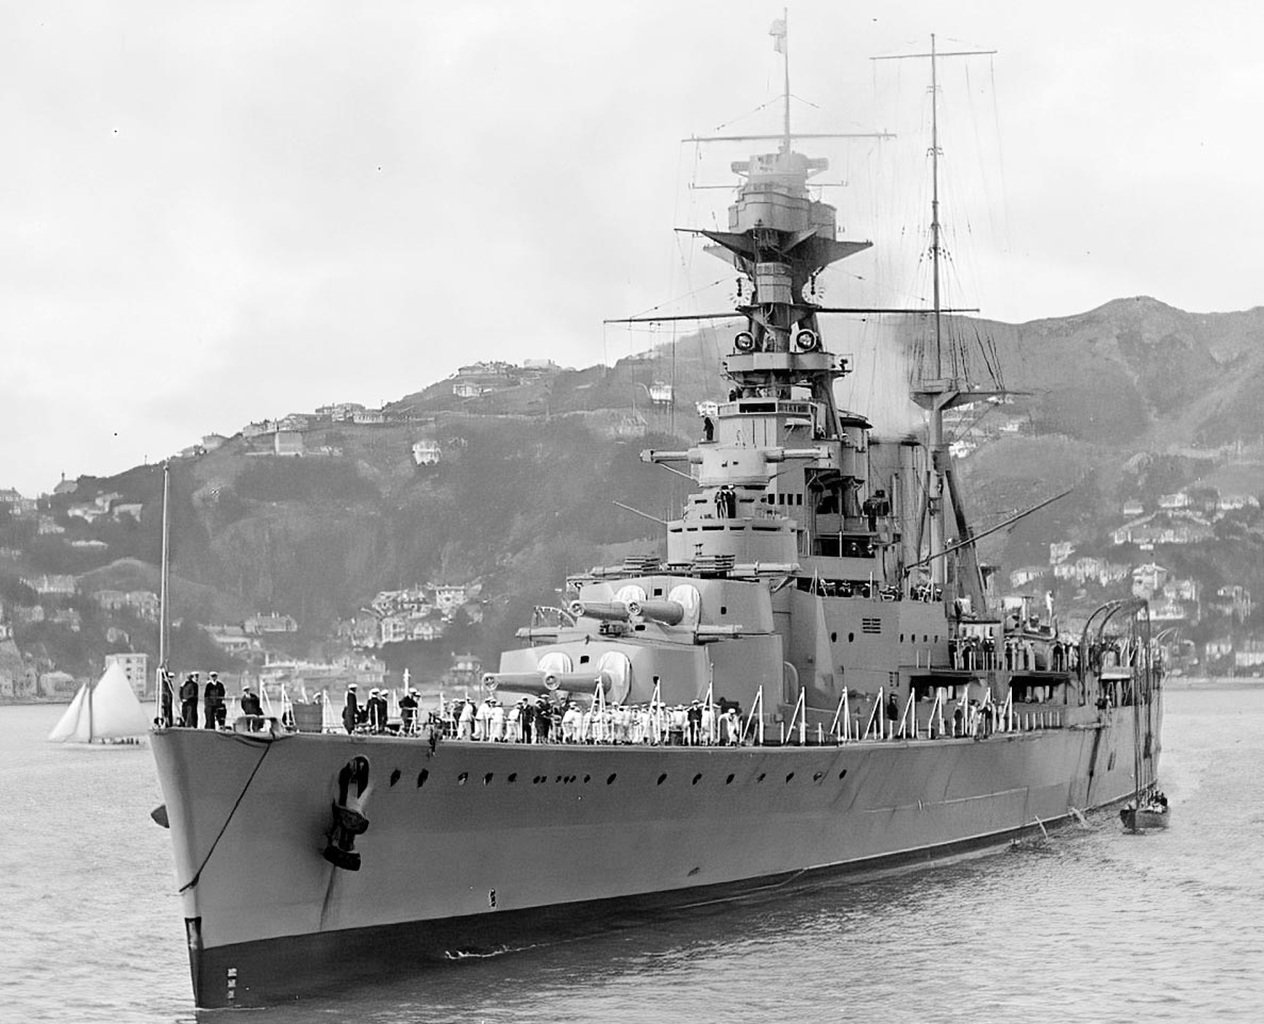
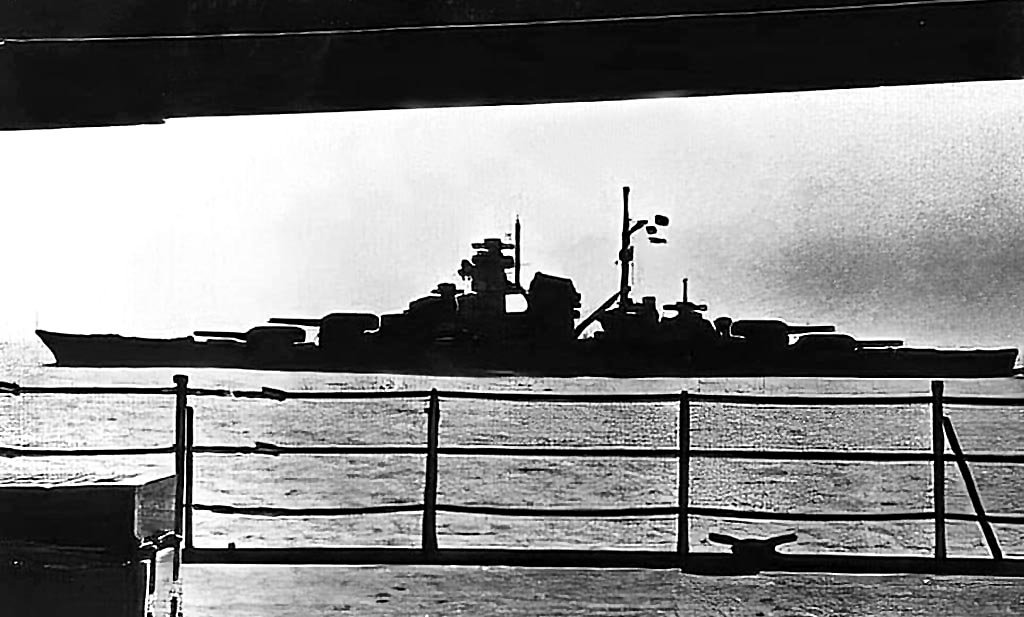
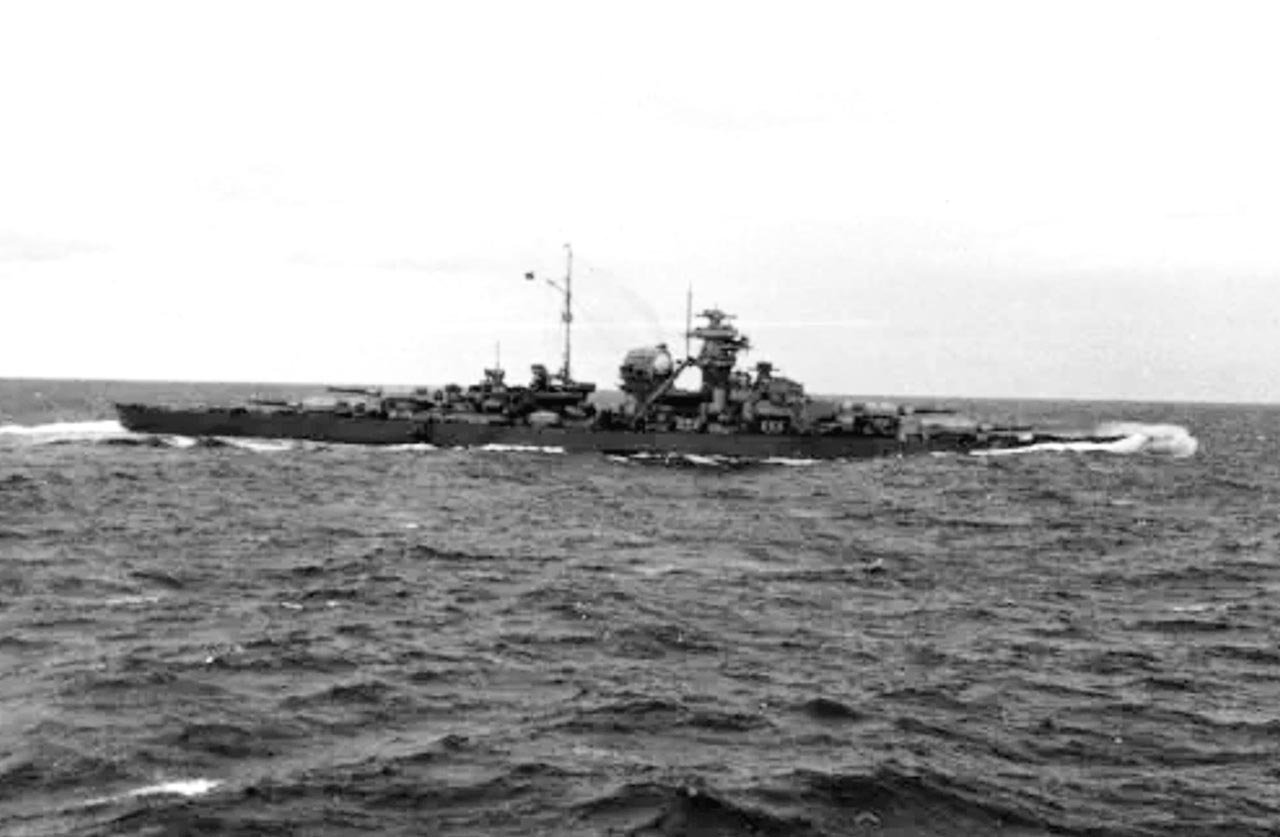
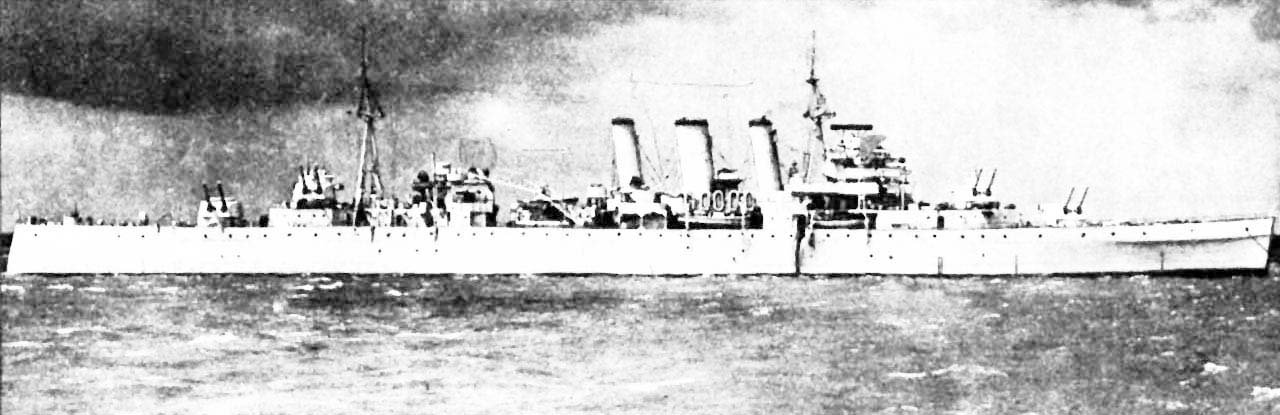
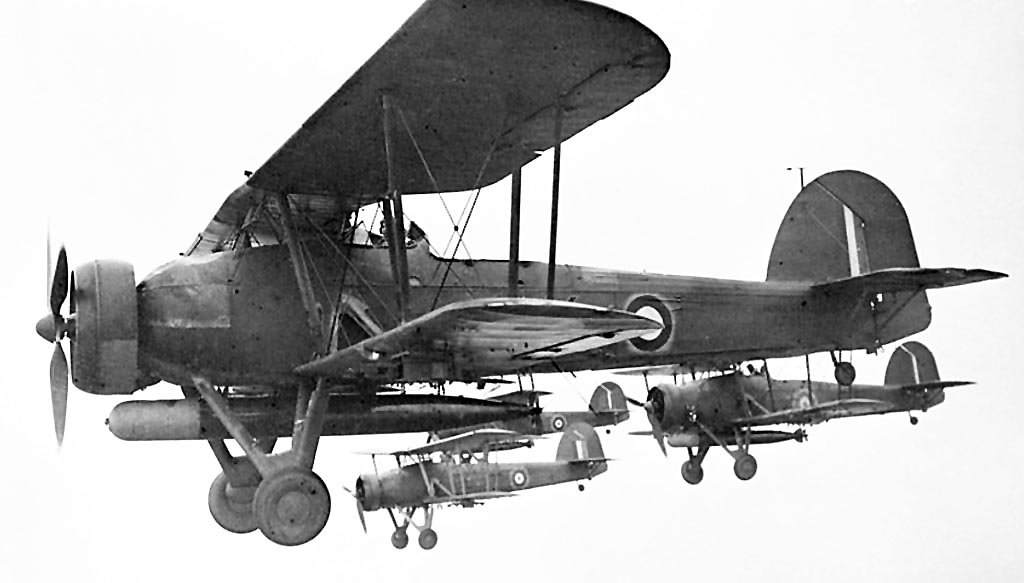
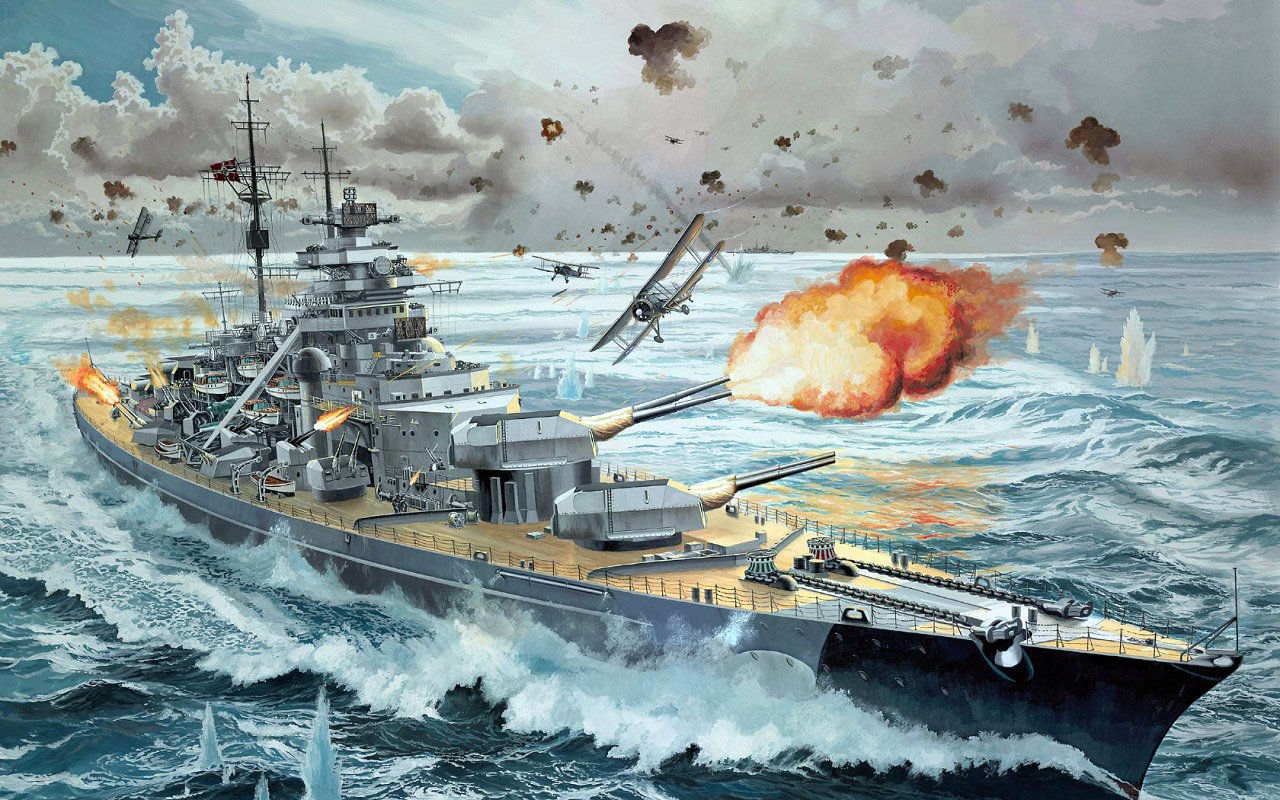
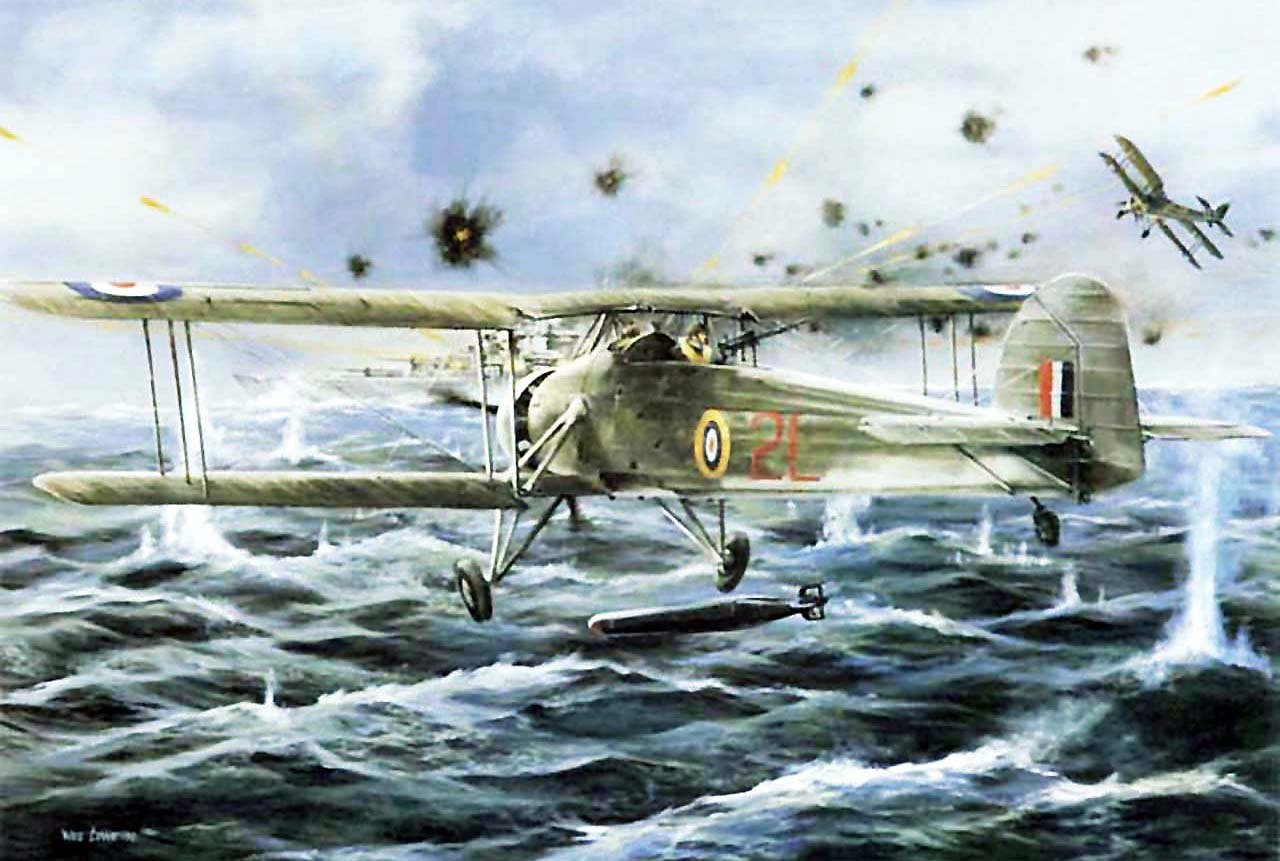
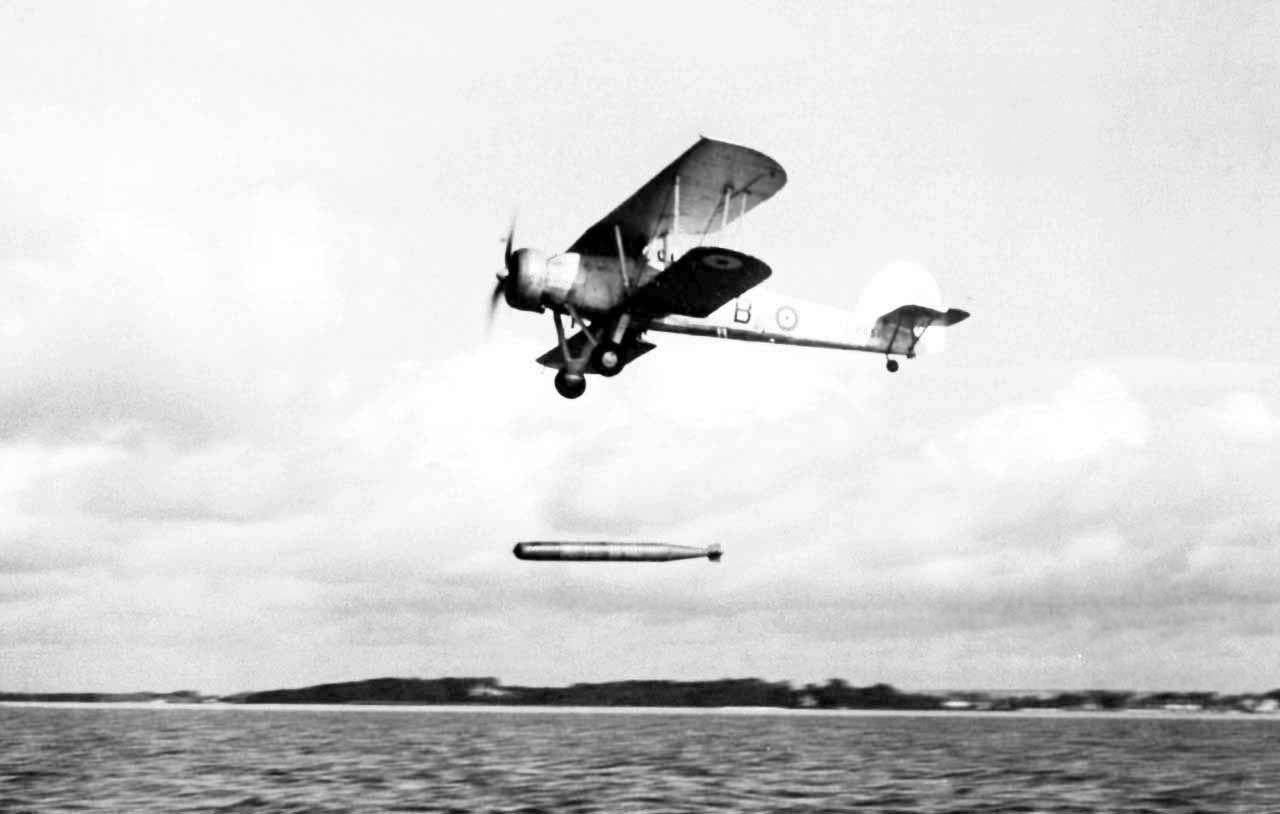
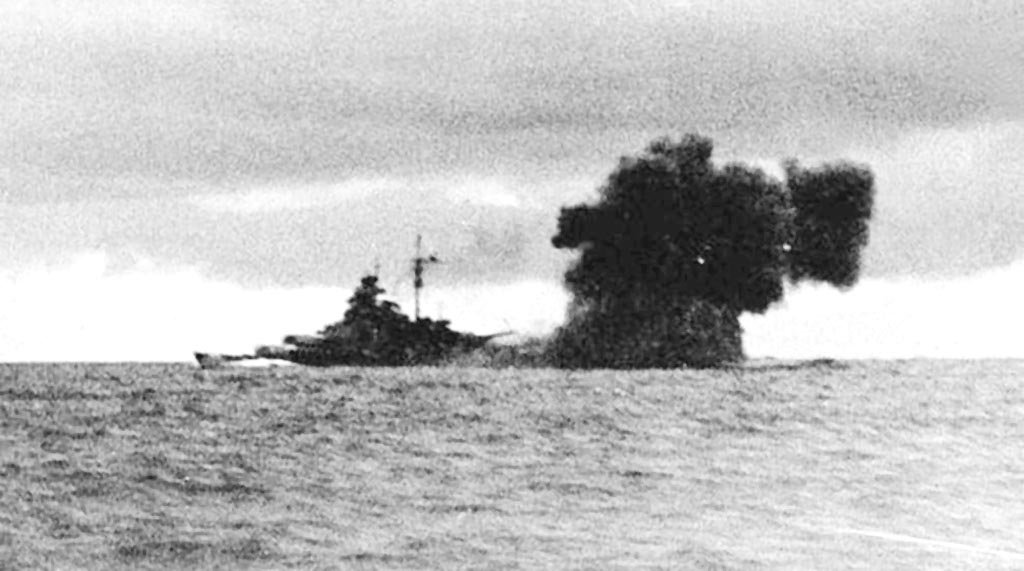
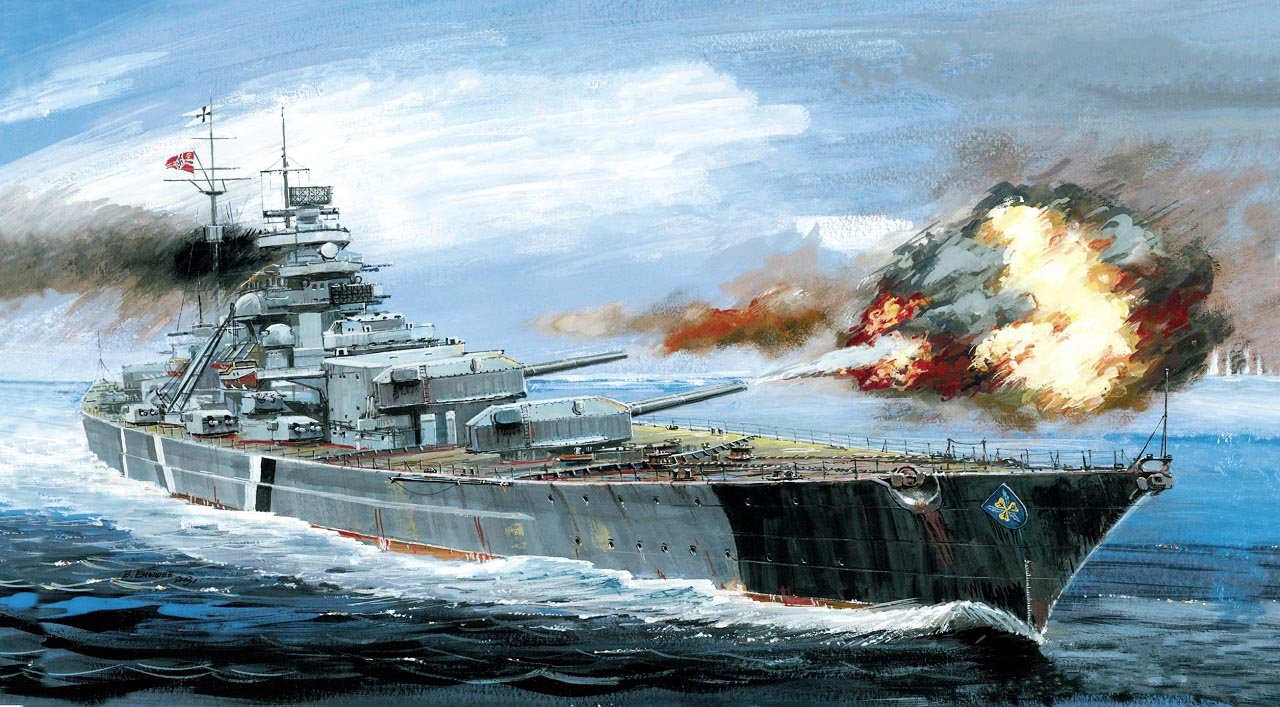
(Bismarck image). The battleship Bismarck was built at the Blohm & Voss shipyard in Hamburg, laid down on July 1, 1936, and launched on February 14, 1939. Eighteen months later, on August 24, 1940, it was commissioned into the Kriegsmarine and began a period of sea trials during which some problems were detected, especially a serious one concerning its maneuverability due to a design flaw. It returned to the Blohm & Voss shipyard on December 9, 1940. After these problems were resolved, the ship was ordered to sail to its home port of Kiel at the end of January 1941, but a cargo ship sunk in the Kiel Canal prevented the Bismarck from moving until March 6.(Bismarck image). During this period, the German Naval Staff was focused on attacking Allied maritime trade routes in the Atlantic Ocean, and it was considered vital to add the Bismarck to the fleet assigned to this task, which consisted mainly of the battleship Tirpitz and the battlecruisers Scharnhorst and Gneisenau, as well as the dreaded U-boats. This force was projected to be divided into two squadrons: one of battleships based in Baltic ports and another of battlecruisers based in Brest, France. The mission would be to sink as many merchant ships as possible, avoiding engagements with enemy vessels, except for convoy escorts. The mission was planned to begin around April 25, 1941, but a series of problems prevented these plans from being implemented.(Prinz Eugen heavy cruiser image). The first problem was that the battleship Tirpitz had only been commissioned on February 25th, so it wouldn’t be ready for combat before the end of autumn. Furthermore, the battlecruiser Gneisenau was undergoing an overhaul and was anchored in Brest, and serious boiler problems had been detected on her sister ship Scharnhorst, keeping her out of service. The British, who had closely monitored the commissioning of the Bismarck and Tirpitz, fearing an incursion into the Atlantic alongside the two powerful battlecruisers, had begun a series of fleet movements and intensified the bombardment of Brest. As a result of these attacks, the Gneisenau was hit by a torpedo in the stern, and while in dry dock to repair this damage, it was hit by several bombs that caused even more damage. Finally, on April 22, 1941, the planned operation began, under name “Operation Rheinübung” (Rhein Exercise), but only with the participation of the Bismarck and the heavy cruiser Prinz Eugen.(Bismarck image). Once again, various setbacks prevented the operation from beginning. The operation essentially consisted of reaching the Atlantic Ocean by crossing the Norwegian Sea and the Denmark Strait to attack the Western Allied shipping ladder bound for Great Britain. Finally, on Sunday, May 18, 1941, at 21:00, the heavy cruiser Prinz Eugen departed from Gotenhafen (Gdynia, Poland), followed five hours later by the battleship Bismarck. They rendezvoused off Cape Arkona on Rügen Island in the western Baltic Sea. There, they were joined by two destroyers and proceeded to the Danish Islands and into the Kattegat, arriving on May 20. The Bismarck and Prinz Eugen then headed toward the Skagerrak, the strait between Jutland and southern Norway.(HMS King George V battleship image). At 13:00 on May 20, the group was sighted by the Swedish cruiser Gotland, which reported to Stockholm the message: “Two large ships, three destroyers, five escort vessels, and 10-12 aircraft passed Marstrand, course 205°20′”. This message was intercepted by the Bismarck, which informed Group North that its position had been compromised. This valuable information, of course, immediately reached the Royal Navy, which had deployed a powerful naval group at Scapa Flow some time before to counter the threat from German surface ships. The British ships assigned to this task were the battleships HMS King George V and HMS Prince of Wales, the battlecruiser HMS Hood, and the aircraft carrier HMS Victorious. In addition, other ships from the Atlantic could be deployed, such as the battleships HMS Revenge, HMS Ramillies and HMS Rodney, the battlecruisers HMS Renown and HMS Repulse and the aircraft carrier HMS Ark Royal.The hunt for the Bismarck had begun.(Bismarck image). What was clear was that the Royal Navy was not going to allow another operation like the successful Operation Berlin, carried out by the Kriegsmarine between January and March 1941, which resulted in the sinking or capture of 22 ships, totaling 115,622 tons, and the almost complete disruption of Allied merchant shipping in the North Atlantic. The German task force continued its voyage and approached the Norwegian coast, where they were spotted between 21:00 and 22:00 by a resistance group from Kristiansand. Again, this information was passed on to British intelligence, and again the Germans intercepted and decoded the British message, which alerted coastal patrol aircraft to search for two battleships and three destroyers.(HMS Prince of Wales battleship image). At 13:15 on May 21, the identity of the German ships was discovered by two Spitfire aircraft sent from Scotland, and at that precise moment, all available ships in the area were mobilized to prevent the Germans from reaching the Atlantic Ocean. Five patrol cruisers in the area were alerted, and the battleship HMS Prince of Wales, the battlecruiser HMS Hood, and six destroyers were deployed in the passages to the Atlantic, particularly those located north of 62° latitude. By 23:00, the German task force had crossed the Bergen fjords and was heading for the Arctic Ocean, while bombers from the British Coastal Command were bombing an empty anchorage in Bergen.(HMS Suffolk heavy cruiser image). On the night of May 22, the battleship HMS King George V, the aircraft carrier HMS Victorious, five light cruisers, and six destroyers departed Scapa Flow for the North Atlantic while the German squadron moved into the Denmark Strait. At 04:00 on May 23rd, the Bismarck, followed 700 meters behind by the Prinz Eugen, was sailing at 27 knots, but by 10:00 a.m. they had reduced their speed to 24 knots due to encountering ice. At 19:22, the German ships detected the British cruiser HMS Suffolk at 12,500 meters, which reported the sighting of the German ships and then disappeared into a fog bank. Subsequently, HMS Suffolk followed the German ships at a safe distance from astern, while an hour later, Bismarck detected another British cruiser, HMS Norfolk, emerging from a fog bank at a range of 6,400 meters. Bismarck fired five salvos at the cruiser, missing all shots directly, although some shell fragments did hit, causing the cruiser to flee rapidly. Due to the gun blast, Bismarck’s forward radar was disabled, and the cruiser Prinz Eugen was ordered to take the lead.(Bismarck image). For several hours, HMS Suffolk followed the German ships at a distance of 24,000 meters, at the limit of radar range, while HMS Norfolk positioned itself close to the Germans. Around 22:00, Bismarck executed a 180-degree turn to engage HMS Suffolk, forcing the British cruiser to lose contact. In the early hours of Saturday, May 24, the two British ships were sailing parallel to the two German ships, while 100 miles to the southeast, HMS Prince of Wales, HMS Hood, and four destroyers were approaching on an intercepting course. At 05:15 on May 24, the cruiser Prinz Eugen made sound contact, and at 05:45, it sighted smoke off the port beam, as the two German ships prepared for combat.(Bismarck firing at HMS Hood image). At 05:52, the opposing forces were 26,000 meters apart, and HMS Hood opened fire, followed a minute later by HMS Prince of Wales. Although the fourth salvo from HMS Prince of Wales straddled the Bismarck, it had not yet returned fire, as Admiral Lütjens, in command of the operation, had not yet given permission to the Bismarck’s captain, Ernst Lindemann. After several minutes of waiting, Captain Lindemann exclaimed: “I will not let my ship be shot out from under my ass!” and demanded permission from Lütjens to return fire, although according to some witnesses, it is likely that Lindemann gave permission to fire before Lütjens ordered it. At 05:55, the Prinz Eugen responded with its 203mm guns, mistakenly believing it was engaging a cruiser. The British ships could not fire with their entire main battery due to the angle of approach to the German ships, so they initiated a 20º turn to port to allow their rear turrets to come into action.(HMS Hood battlecruiser image). The battlecruiser HMS Hood fired its 381mm guns at the cruiser Prinz Eugen, mistaking it for the Bismarck, while the two German ships concentrated their fire on the HMS Hood, as it was the most powerful vessel in the British formation. The HMS Hood was hit by a 203mm high-explosive shell from the Prinz Eugen, which caused a brief burst of fire that was quickly extinguished, but allowed the Bismarck’s gunners to adjust their range and bearing using their firing directors and stereoscopic rangefinders. The Bismarck’s third salvo straddled the HMS Hood with 380mm shell splashes, and at 05:58, after only three salvos, the Bismarck’s gunnery officers ordered the Prinz Eugen to turn its guns on the battleship HMS Prince of Wales.(HMS Hood battlecruiser image). The Bismarck’s fourth salvo was a full eight-gun salvo, one or more shells of which struck near the rear turrets of HMS Hood, causing a massive explosion at 06:01. This sent flames hundreds of meters into the air, followed by a gigantic white fireball accompanied by what appeared to be orange flares. One of the rear turrets and the mainmast were blown off, and a large cloud of smoke reached several thousand meters in height. Through a thick curtain of smoke, broken sections of the bow and stern could be seen; it was the end of the mighty HMS Hood, the pride of the Royal Navy. In a final act of courage, the forward guns fired a last salvo as the ship sank to the bottom of the sea just eight minutes after the engagement began. The British escort destroyers were only able to rescue three survivors from a crew of 1,419 officers and sailors.(Bismarck firing at HMS Prince of Wales image). Following the sinking of HMS Hood, all German fire was concentrated on HMS Prince of Wales, which was hit twice at 06:02 during the eighth and ninth salvos fired by Bismarck. At approximately 06:00, the cruiser HMS Suffolk had hit Bismarck in the stern with several 203mm shells, although without causing serious damage. At approximately 06:05, HMS Prince of Wales withdrew from the area under a hail of German shells, and at 06:09, the German ships ceased fire after scoring three 380mm and four 203mm hits on the British battleship. HMS Prince of Wales sustained heavy topside damage, several malfunctions in her main battery turrets, moderate flooding from shell waterline hits, and the temporary loss of her after turret due to a sharp port turn as she withdrew from the battle. The Bismarck fired 93,380mm AP shells while the Prinz Eugen fired 179 203mm AP and HE shells during the engagement.(Bismarck drawing). During the battle, Bismarck sustained two 356mm shell hits and a third glancing blow from a distance of between 20,000 and 22,000 meters at low angles of incidence. These impacts caused damage to the bow and the port underwater protective system, just abaft the main conning tower. However, the most serious damage was caused by a 356mm shell that passed through the 60mm splinter belt in compartment XXI without exploding, opening a 1.5-meter exit hole in this belt, above the waterline but below the bow wave. The shell’s trajectory carried it through a main transverse bulkhead between compartments XX and XXI, flooding two watertight compartments with between 1,000 and 2,000 tons of seawater. Furthermore, the Bismarck left a visible oil slick as it sailed.(Bismarck image). The crew of the Bismarck requested permission to reduce speed, but Admiral Lütjens refused, and a speed of 28 knots was maintained for tactical reasons. This increased the ship’s damage and allowed more water to enter. In addition, another main watertight was damaged, and the main line from the forward fuel tanks was severed. A bilge pump and a fuel-oil transfer pump were underwater and unusable, meaning that approximately 1,000 tons of fuel were unusable. Some of the fuel was also being contaminated by mixing with seawater, and the ship was constantly leaking into the sea due to the combat-induced leak. The Bismarck had dropped 2 degrees by the bow and was listing slightly to port. Some repairs were initiated to prevent further water ingress, and an attempt was made to transfer fuel-oil to settling tanks in the boiler rooms via a bypass, but this proved unsuccessful. At this time, the ship’s speed was reduced to 22 knots to facilitate these repairs, with the available fuel being about 3,300 tons. At a speed of 30 knots, the average fuel consumption was about 1,000-1,100 tons/day using 10 boilers, giving the Bismarck a range of about 2,000 miles at 30 knots.(Bismarck after Denmark Strait battle image). An hour after the engagement, the trim increased to 3° by the bow and there was a 9° list to port, which wasn’t particularly serious, but forced the Bismarck to cancel its mission. Admiral Lütjens and Captain Lindemann decided to steer the Bismarck towards the ports of Brest or St. Nazaire for repairs, which were expected to be minor. An assessment of the situation revealed three main factors for the withdrawal to port: – damage to the bow and outboard tanks was causing fuel loss, which would reduce the operational range by 1,100 miles if all the fuel stored in that area was lost; furthermore, repairs could not be carried out at sea; – due to the effective British radars, they could maintain contact with the Bismarck at all times, which prevented refueling at sea. – half of the electrical power reserve had been lost due to the flooding of turbo-generator room 4, and the speed could be reduced to only 26 knots if the two boilers in boiler room 2 were rendered unusable by flooding.(HMS Norfolk heavy cruiser image). The cruisers HMS Norfolk and HMS Suffolk, along with the battleship HMS Prince of Wales, were pursuing the two German ships at a distance of 40 km. At 18:14 on May 24, the German ships separated to try to break contact with the British, and the Bismarck closed in on the cruiser HMS Suffolk during this maneuver and opened fire without success. At 18:30, the British Admiralty ordered 19 ships to join the pursuit of the Bismarck. At 18:46, HMS Prince of Wales opened fire and fired 12 salvos at the Bismarck from 27,500 meters, while the Bismarck fired 9 salvos, with no effect on either side. At 20:56, Admiral Lütjens reported to High Command: “Shaking off contacts impossible due to enemy radar. Due to fuel, steering to St. Nazaire”.(Swordfish torpedo bomber image). At 22:00, the aircraft carrier HMS Victorious was ordered to launch an air attack against the Bismarck, and six Fulmar fighters and nine Swordfish torpedo bombers took off. Surprisingly, the pilots of these aircraft had never flown from a carrier at sea before, but there’s a first time for everything, right? This squadron nearly attacked the cruiser HMS Norfolk and a US Coast Guard cutter by mistake, putting the Bismarck on alert. The Bismarck then prepared all its anti-aircraft artillery in anticipation of an attack. At 23:27, the Bismarck’s radar detected the British aircraft, which launched their attack under harsh weather conditions and intense anti-aircraft fire. Fulmar fighters strafed and bombed the Bismarck in an attempt to reduce its heavy anti-aircraft defenses, though with little success. Meanwhile, eight Swordfish torpedo bombers attacked the port side and one the starboard side, but the Bismarck maneuvered skillfully and evaded eight of the nine torpedoes launched. No aircraft was shot down during the attack, although two Fulmar fighters later failed to return to the HMS Victorious.(Bismarck drawing). The torpedoes had been configured for a depth of 9.45 meters, but the one that struck the Bismarck hit the starboard side just below the waterline, on the main side belt near the foremast, raising a large column of water followed by a burst of black smoke from the stack. This indicated a large shock response from the torpedo explosion, which caused severe damage in the area. The starboard side generator room was destroyed, injuring five crew members, and one crew member standing directly above the point of impact was killed. The bow trim increased, but no external damage was visible where the torpedo struck, although the displacement of the main side belt inboard, along with previous 380mm gun fire, had enlarged the cracks in the damaged bulkhead at the forward boundary of port number 2 boiler room. This caused the boiler room to fill with water and become disabled, leaving the Bismarck without the two boiler rooms on the port shaft.(HMS Prince of Wales battleship drawing). Due to damage and heavy weather, the Bismarck’s speed was reduced to 16 knots, although it was able to be increased to 20 knots after divers carried out some emergency repairs in the flooded compartments. The British ships lost visual contact during the air attack, but re-established it at 01:30 on May 25 due to the Bismarck’s reduced speed. At 01:31, HMS Prince of Wales fired two 356mm salvos at the Bismarck from 15,000 meters without effect. The German ship responded with two 380mm salvos, which also had no effect. The cruiser HMS Suffolk again established radar contact with the Bismarck, being port-side of the German battleship. At 03:10 the Bismarck began a large turn to starboard that took it away from its pursuers, although it was still detecting emissions from British radars at a distance of 41,000 meters.(HMS King George V battleship image). At this point, the British ships had lost contact with the Bismarck. Although the radar transmitter had enough energy to be detected by the Germans, British radar receivers could not pick up the signal’s reflection from such a distance, a fact unknown to the Germans. At 07:00 and 09:00, Admiral Lutjens sent messages to Naval Group West in Paris. The second message was intercepted by the Allies, who relayed the coordinates of the transmission point to Admiral Tovey’s flagship, the battleship HMS King George V. Unfortunately, these coordinates were plotted incorrectly, and the British ships followed wrong courses for seven hours. By 09:30 on May 25, 46 British warships were involved in the hunt for the Bismarck and British intelligence was making every effort to fully decode the intercepted message, since they had been able to decipher a part that mentioned that the Bismarck was heading to Brest, although the real destination was St. Nazaire.(British PBY Catalina flying boat image). Knowing, even if incorrectly, the Bismarck’s destination gave the British the opportunity to concentrate ships along the possible access routes to Brest. In addition, a squadron of American PBY Catalina flying boats based at Lough Erne, Northern Ireland, was mobilized. These flying boats, loaned by the US Navy to the British Coastal Command for combating German surface raiders, were operated by American crews and were deployed to conduct reconnaissance in areas where the Bismarck might pass on its way to the French coast. Meanwhile, aboard Bismarck, divers managed to open some valves located in the flooded compartments, allowing them to recover several hundred tons of the precious and scarce fuel oil.(HMS Ark Royal image). Thirty-one hours passed from the last radar contact established by the cruiser HMS Suffolk until the Bismarck was detected again, at 10:30 on May 26th, when a PBY Catalina flying boat located the Bismarck 690 miles northwest of Brest. The German battleship’s speed would allow it to be protected by German submarines and Luftwaffe bombers in less than 24 hours, and there were no British ships in the area that could intercept it. Only the aircraft carrier HMS Ark Royal, the battlecruiser HMS Renown, and the cruiser HMS Sheffield were relatively close, so it was decided to launch an air attack to slow her progress. HMS Ark Royal launched several reconnaissance aircraft to locate the Bismarck, and at 11:54 a Swordfish torpedo bomber located the German ship, following it for some time. Full confirmation that it was the Bismarck and not the cruiser Prinz Eugen came in the early afternoon, at which time it was located 100 miles southeast of HMS Ark Royal.(Swordfish drawing). The cruiser HMS Sheffield was dispatched from Force H to establish radar contact with the Bismarck and act as a guide for the air attacks. Between 14:50 and 15:00, 15 torpedo bombers took off to attack the Bismarck, which was 40 miles from their position. These aircraft were not warned of the presence of HMS Sheffield, and as soon as they located it with their radars, they launched 11 torpedoes, which fortunately missed the cruiser. Many of them exploded after short runs due to faulty Duplex detonators. A second attack was launched at 19:10 in very rough seas, with torpedoes equipped with contact pistols and set to run at a depth of only 7 meters. From 17:40, HMS Sheffield had visual and radar contact with the Bismarck, which had sighted the British cruiser at 17:24 and declared battle stations.(Swordfish torpedo bomber image). The final attack began at 20:47, when groups of three aircraft attacked the Bismarck for 30 minutes. The battleship managed to evade 13 torpedoes by violently changing course in the rough seas, which greatly reduced its speed. All of the Bismarck’s artillery, including the 380mm guns, fired to defend against the Swordfish, which in the first 15 minutes had managed to hit one or two torpedoes in the aft midship area. Near the end of the attack, two Swordfish approached, flying at sea level from the port side, and at a distance of about 450-500 meters, managed to launch two torpedoes, one of which struck the Bismarck in the stern area, sealing its fate. After the attack, all Swordfish returned to HMS Ark Royal, although four of them were badly damaged due to anti-aircraft fire.(Bismarck image). The first (or first two, according to some witnesses) torpedo impacts, occurring around 21:02, caused some minor flooding and small cracks in the port shaft alley, along with a momentary shutdown of the turbines. This can be considered minor damage, as the explosions were largely contained by the underwater protection system and the armor belt. However, the impact at approximately 21:15 was the most devastating, as it struck the shell plating below the level of the steering room and near the port rudder shaft. This torpedo tore a large hole in the shell plating and severely damaged the port coupling of the rudder shaft to the steering engine. Both rudders were jammed at 12° to port and ripped, and a huge hole was torn in the bottom shell, flooding both steering compartments.(Bismarck drawing). From this moment, the Bismarck’s course became erratic, bringing it close to the cruiser HMS Sheffield. Suddenly, the Bismarck emerged from the fog and began firing its 380mm guns at the unsuspecting cruiser. The third salvo landed beam, killing three and disabling the radar, forcing the cruiser to flee amidst three more broadsides that landed nearby. Contact was lost at 21:55, and despite the Bismarck’s crew’s valiant efforts to free the rudders and regain control of the ship, it was impossible. The ship was heading northwest, away from safety and toward the enemy. Although attempts were made to steer the Bismarck using combinations of RPMs to the propellers, the wind and waves kept pushing the ship back onto a northeast course, even though it managed to change course at times.
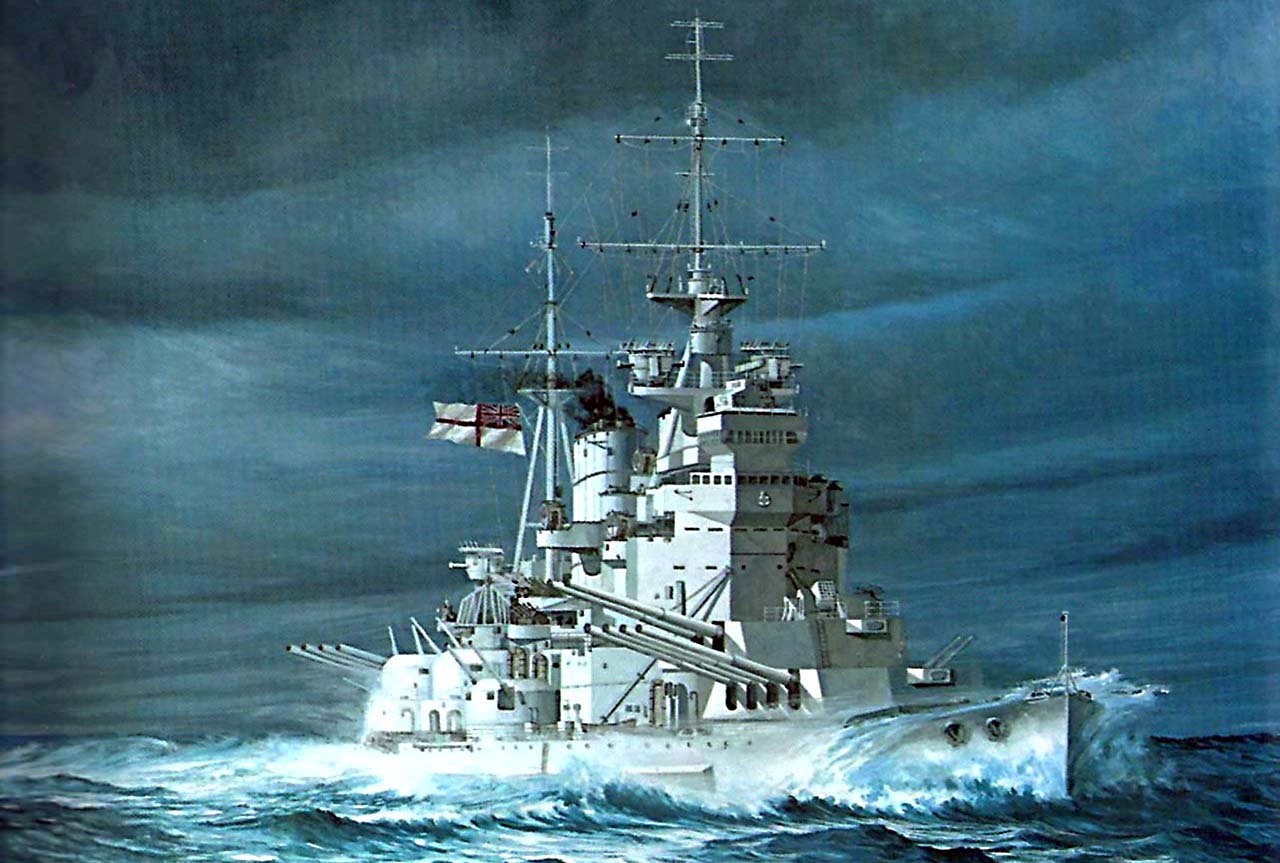
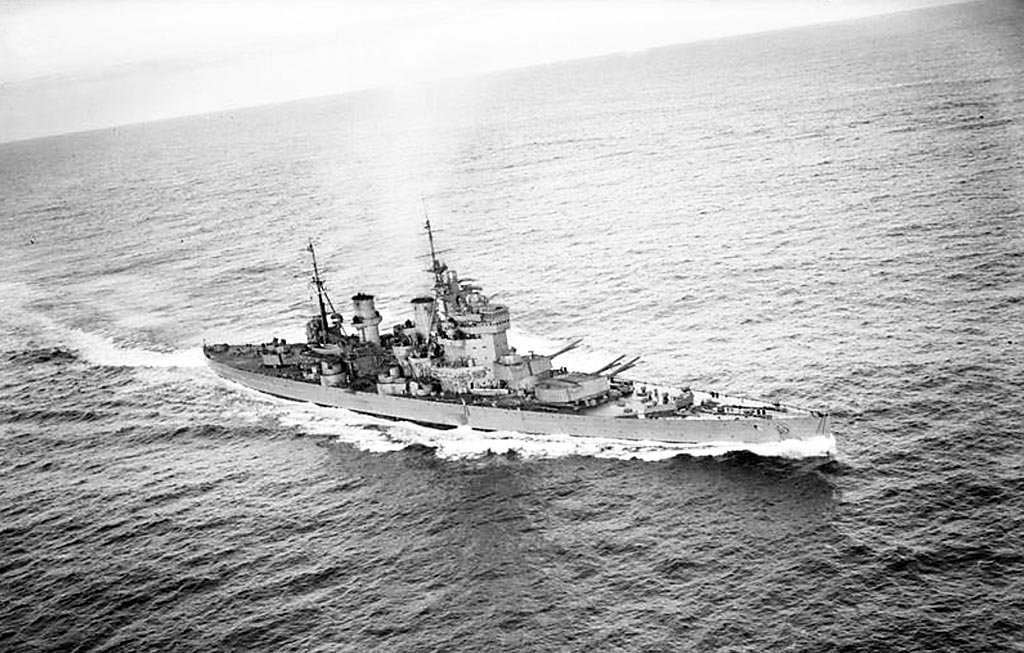
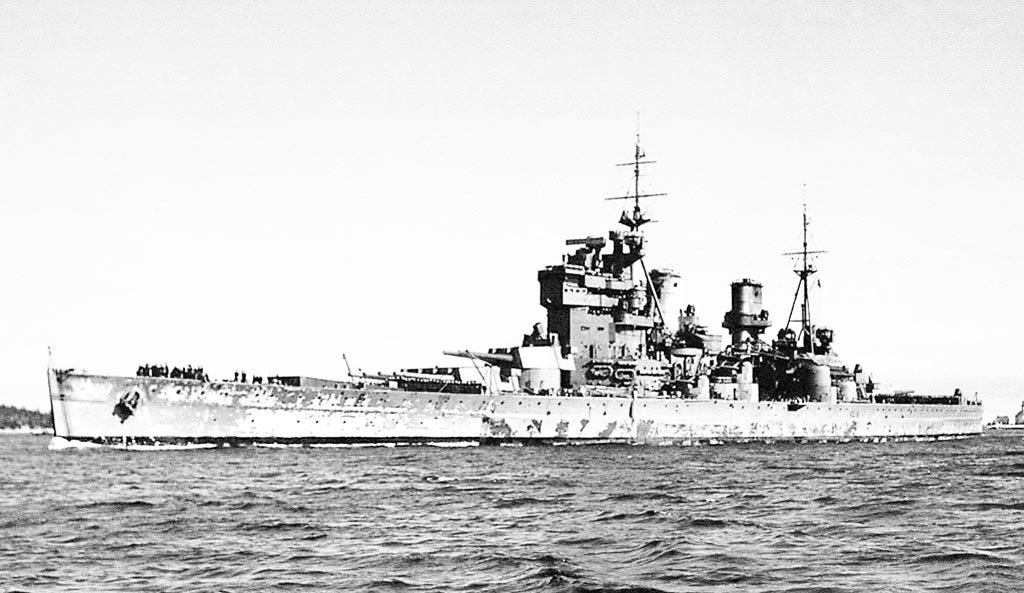
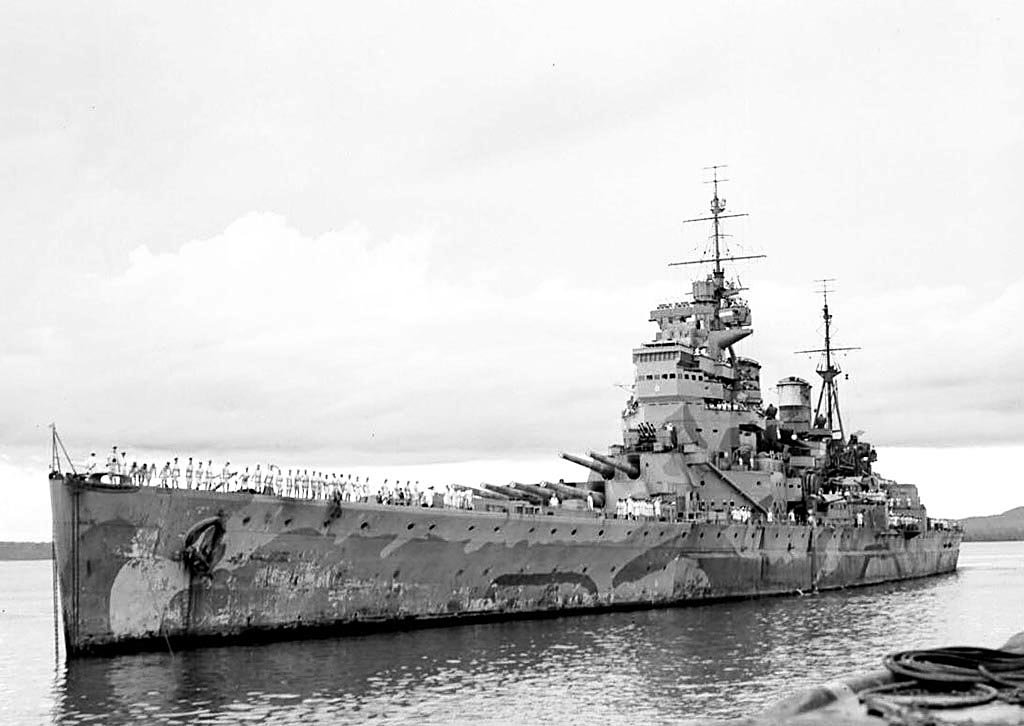
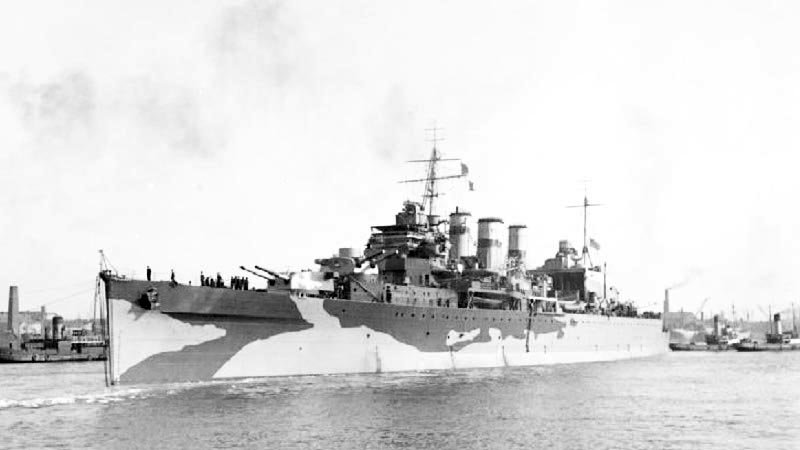
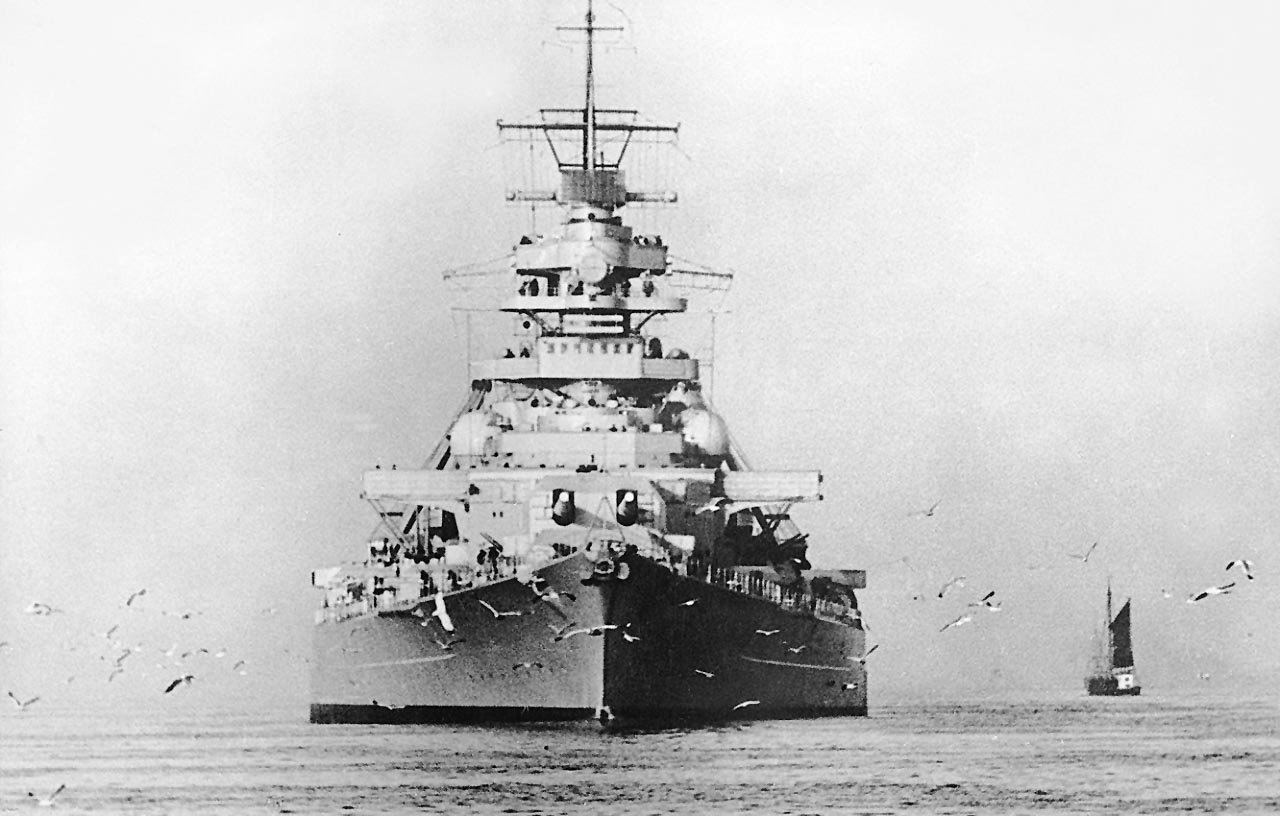
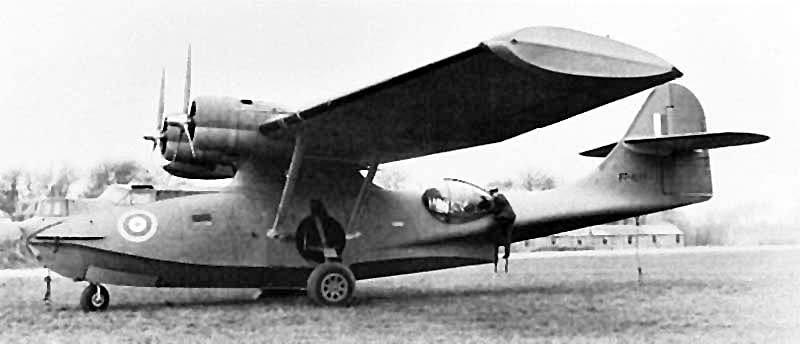
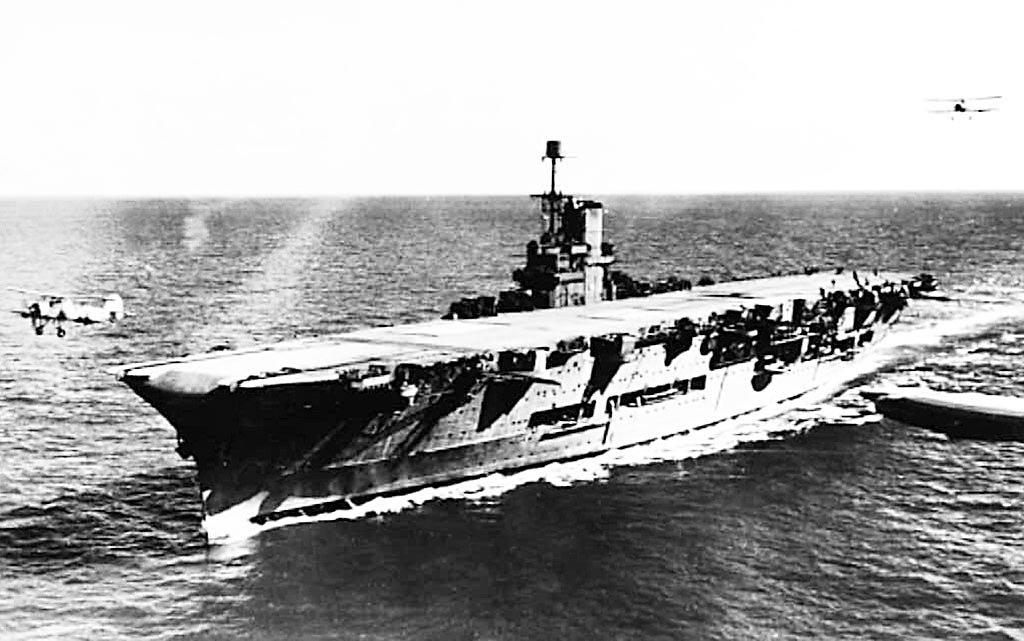